Related Posts Plugin for WordPress, Blogger...

Sunday 30 June 2013

A Summer Cloud Mani

Summer Cloud Mani

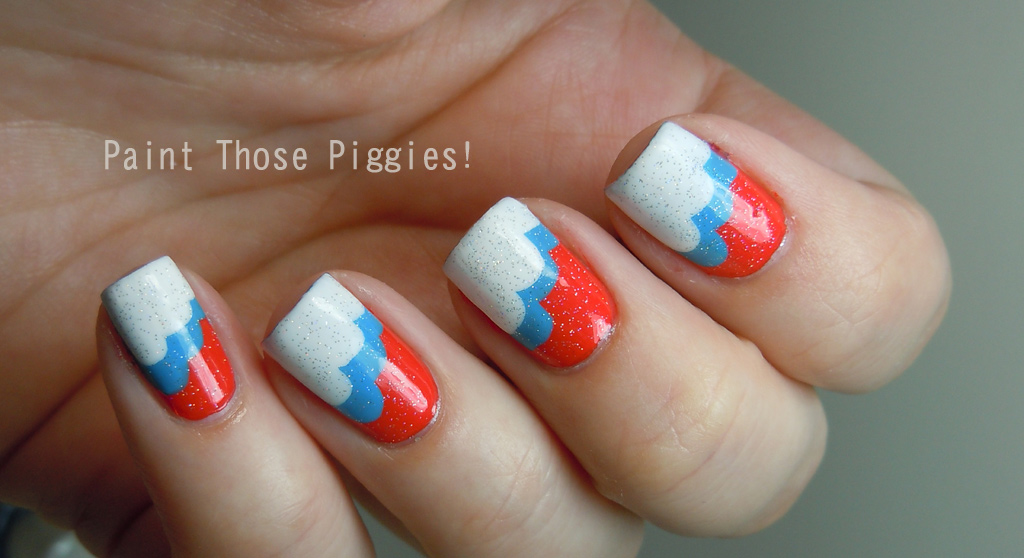
Hi everyone, happy Sunday!  I had a nice relaxing day yesterday which I loved :)  Today we are headed out with friends to go see Monsters Inc. University.  I've always loved animated movies, they usually make me cry more than regular movies lol.  Today I have a mani that I wore yesterday.  I love cloud manis because they are simple to do and I love the endless number of color combinations that can be done.  I started with three coats of OPI My Paprika Is Hotter Than Yours! which is a fiery bright orange.  I layered on China Glaze Sunday Funday, a pretty ocean blue and then finished off with two coats of Maybelline Color Show Porcelain Party.  It was an unusual color combination for me but I really liked the impact of the white against the bright colors.  Finally I finished off with one coat of China Glaze Fairy Dust, a recent addition to my collection.

I mentioned a few days ago that I decided to do my very first "no buy" month in July.  I wanted thought I should do this in anticipation for the fall collections coming out.  Fall is my absolute favorite time of year so I'm sure there will be lots of colors that I want to pick up.  Have any of you ever done a no buy?  Naturally I plan on going to Ulta today for one last fix ;)


Saturday 29 June 2013

My First Sinful Colors

Sinful Colors: Dream On (Matte)

Hi everyone!  Happy Saturday :)  I've been busy so far.  The hubby and I went to the farmer's market and discovered a co-op health food store where I found lots of allergy free products.  Today I have my very first Sinful Colors polish.  I won this polish in a giveaway and really loved the color.  I didn't realize it was matte until I put it on but then I noticed it did say matte on the bottom of the bottle.

I have to say that I had a bad time with this polish.  It applied just fine, in two coats and it dried quickly.  All was good until I woke up the next morning.  I applied this polish around dinner time and then woke up with a ton of chips.  Almost every nail had a chip on it and I ended up having to remove it before I went to work.


Have you tried and Sinful Colors polish?  Did you have a good experience?

Friday 28 June 2013

Teeny Bikini Mani

Teeny Summer Bikinis

Hi everyone and welcome to Friday :)  I am happy that the day has come, now I just need to get through the next 9 hours and I'm home free!  What do you have planned for the weekend?  This weekend will be the first in the last couple that I don't have any major plans.  I don't mind that at all though, I'm a homebody.  Tomorrow morning I'll be going to the farmer's market and maybe the hubby and I will rent the Oz movie on redbox.  Thrilling, I know ;)  

Today I have a mani that screams summer to me...teeny bikinis.  I did all the nail art with dotting tools and nail polish.


I started with a base of a shimmery aqua to represent the water.  The color was OPI Austin-tatious Turquoise.  Then I used the following colors-Essie Licorice (black), Essie Go Ginza, Zoya Suri, Zoya Josie, OPI Jade is the New Black, Zoya Thandie, OPI My Paprika is Hotter Than Yours!, Zoya Blu, Zoya Rocky, and Zoya Darcy.  Whew...long list!


Have a great weekend everyone :)

Thursday 27 June 2013

My First Attempt to Tribal Nail Art

Hello Folks, today I am back with a tribal nail art design. A few days ago, I was surfing internet for some new inspiration for my DIY nail art collection and found tribal nail art is quite popular these days. I have tried almost all DIY nail art techniques including dotting nail art, striping nail art, stamping and ombre nail art. So, thought to try something new.


Here I want to share my first attempt for tribal nail art and I would say the results are awesome. Anyhow, not satisfactory for me. So, let's start how to make tricky looking tribal nail art easy..!!


Things Required:

As always suggested, collect all required things at a place where you are going to try your nail art.

  1. Some colorful nail polish: pink, yellow, green, red and blue.
  2. Black nail art pen.
  3. Nail dotting tool. (I bought from ebay India)
  4. Top coat (preferably fast drying).

Steps For Tribal Nail Art:

First of all, remove old nail polish with good quality remover.


Step 1: The first step is to apply different nail polish colors for the base of your nail art. I have applied five different nail polish colors to give a trendy look. I have selected all bright colors so that my design pop out.
You can select single color for your nail art. It's all depending upon you. Let it dry before proceeding.


Step 2: Now, draw some horizontal lines with nail art pen, as shown in the photo. You can do it with your own idea as per your design.


Step 3: Next step is to make some lines, zig-zag and crosses in few lines. Take an idea from the design.


Step 4: Here is the final step. Take the nail art dotting tool. I have bought from ebay India as these tools are now available for direct selling in India. Add some dots with the nail dotting tool in the rest of the area.

Step 5: Apply fast drying top coat and lock your nail art for long lasting look.


I hope you like my colorful tribal nail art tutorial. Share it with your friends and family...:)

Blackhawks Win!

Blackhawks Win Mani!

Hi everyone, happy Thursday!  One day closer to Friday :)  I did have this post planned for yesterday but we had really strong thunderstorms which knocked out our power from 5:30pm to 10pm (gasp!).  Therefore, no post.  This post is for the hubby who is a huge Chicago fan because he grew up there and therefore, a huge Blackhawks fan.  The day before the big game he requested the stripes that are on the Blackhawks jersey.  This is my second attempt at stripes, the first was too poor to show.  Everything was going well until my topcoat smeared the black all over the white.  Regardless, I wanted to show it anyway :)

For those who read my post a few days ago, I mentioned that I was getting my test results on Wednesday.  I had self diagnosed myself with a dairy allergy five months ago and have been dairy-free since then.  The good news is that nothing else was wrong besides my food allergies....and then I looked at the results.  Allergic to dairy, eggs, wheat/gluten, and peanuts.  To put it mildly I was floored.  Now I'm just trying to cope and figure out what to eat.  The good news is that my constant fatigue and being sick every month will finally go away!  Sooooo.....anyone have any experience with the paleo diet ;)


I used a JulieG polish for the red, but it doesn't seem to be labeled with a name (?).  For the white I used Maybelline Color Show Porcelain Party and the black is Essie Licorice.  


Tuesday 25 June 2013

Maybelline Color Show

Maybelline Color Show: Coral Crush and Shocking Seas

Hi everyone and happy Tuesday!  Today I've got some fun summer swatches to show you.  Admittedly my mind has been elsewhere for about a week.  Tomorrow I have a doctor's appointment three hours away in downtown Chicago where I will hopefully get answers for the past two years of chronic fatigue and stomach pains.  It's all I can think about lately and I just want it to be over with at this point.  I had my appointment two weeks ago and tomorrow is the appointment with all of the test results.  Sorry to get personal, I just felt as though it was important.

Today I have two polishes that I won in a Rite Aid giveaway.  First up is Coral Crush.  This has actually become one of my favorites in my entire collection and I've worn it three times since I got it a few weeks ago.  I realize now that my color is slightly off in the photos...too dark and too red (it also could be my work computer).  This color is a medium pinky coral creme and photos are two coats without topcoat.  I did put the second coat on a little thicker to cover up the streakiness of the first coat.


Second is Shocking Seas, a bright teal crelly.  Below is three coats without topcoat.  I really like the color of this one but I'm just not a crelly or jelly fan personally.  The teal blue is very pretty though!


Sorry for the short post!  I knew it was going to be a rough day today basically playing the waiting game.  Thanks for the continued support.

Monday 24 June 2013

OPI Gargantuan Green Grape: Two Versions

OPI Gargantuan Green Grape: One Name, Two (Three?) Colors

Hi everyone, welcome to Monday.  The weekend definitely went by too quickly!  If you follow me on Instagram, you may have noticed my sizable Ulta haul on Saturday.  I noticed a beautiful pale blue polish on the shelf, one I had never seen before, and had to have it.  I picked it up, looked at the name, and to my surprise found that it was OPI Gargantuan Green Grape.  A few weeks ago, I picked up the pale, minty version of the same polish.  When I got the minty version, I had to decide between the pale, minty cream version and a second green version which had more yellow and appeared to be on the crelly side.  So now I'm up to three different versions of the same polish.  What is going on?  Nevertheless, today I bring you the pale blue and the pale green versions.

First up are the bottle comparisons.  One in the lightbox, one with the names (for proof I guess?), and then in the sunlight.


Onto the actual polishes....first up is the pale mint version.  The formula was difficult, it flooded my cuticles and I needed three careful coats to cover up.  Guess what, I don't care!  The color is too beautiful so the bad formula goes to the back of my mind.  All photos are without topcoat.


Finally is the pale aqua blue version.  This polish had a hint of green and a little bit of dustiness too it.  The formula was the same as the green but again, the color was just so stunning.


Do you own this color?  If so, what version do you have?

Sunday 23 June 2013

Orly Glowstick

Orly Glowstick: Swatches and Review

Happy Sunday everyone!  I'm still at my parents house this morning but am heading back at lunchtime.  I saw World War Z last night and thought it was pretty good.  I'm not a big fan of scary movies, and it was on the scary side for me....this being said, I do watch The Walking Dead by myself so I'm not too much of a wimp.  I thought the story line was good though.  

Today I have a really cool polish that I first saw on Pinterest.  I knew that I had to have it being the yellow fan that I am.  Orly Glowstick is a neon highlighter yellow.  As with neons and yellow polishes, the formula wasn't great but it was manageable if you like the color.  I used three relatively thick coats to get the eye-searing color seen below :)


So what do you think?  Would you rock this color?

Yellow Half Moon Sponge Nail Art Tutorial

Hello Folks, today I thought to take the sponge nail art technique to the next level of the gradient. Previously, we used this nail art technique to create basic gradient nail art design and background for beautiful sponge nail art tutorial. So, today I planned to create half moon DIY nail art design with sponge technique.


Let us start the tutorial. I hope you will enjoy it.

Things Requires:

It is always suggested to collect all required things for nail art at a place for ease in work.

  1. Nail polish colors: yellow, orange.
  2. Top coat (preferably fast drying). 
  3. Rhinestones
  4. Nail Art pen: black and silver.
  5. Some circular stickers


Steps for Nail Art: 

First of all clean your nails and remove old nail polish with remover. An easy tip to keep your nails strong and healthy is to use olive oil and massage your nails whenever you change nail polish.

Step 1: Now, apply yellow nail polish for the base of your sponge nail art. I would like to recommend you to apply two coats for fine base of your nail art. Let it dry completely. You can use nail polish dryer for quick work.


Step 2: Once your base is dried, now paste a circular sticker on your nails as shown in the picture. You can cut paper tape into circular shape or buy stickers from any stationary. Do paste sticker on your hand 2-3 times to reduce its stickiness. Otherwise, it will lift off your nail polish when you will remove it.


Step 3: Next step is to take a plastic sheet or surface and apply some orange and yellow nail polish on it as shown in the picture. Now, mix it with toothpick and take the impression on a sponge piece.


Step 4: Apply the sponge on your nail as shown in the picture. Repeat it if required. Let it dry.


Step 5: Now, remove circular stickers from your nails and apply top coat and your yellow half moon sponge nail art is ready.


Additions:

You can make some additions to your DIY sponge nail art. I have added a black bow on the third finger nail. Do some practice before trying it on your nail for fine and clean work. You can use black nail art pen for ease in your work.


How about silver dots with 5*2 way nail art dotting tool around black bow?


You can also add some rhinestones on your nails for a chic look.


I hope you like my yellow half moon sponge nail art tutorial. Share it with your friends and family...:)

Saturday 22 June 2013

Saturday Swatch Spam: OPI Polish

OPI Swatch Spam: 4 polishes

Hi everyone and happy Saturday!  I hope the weekend is treating you well.  Today I'm doing some shopping with my mom and then we are going to see World War Z tonight.  I really love going to the movies!  Today I have some OPI swatches that I've done over the past couple of weeks.  Let's get started :)


OPI Jade is the New Black

First up is my only green OPI.  I have a thing for green polish.  I ordered this one online and it looked different than I expected.  I expected a clear jade color but this is a muddier version of jade.  The formula was good, shown is two easy coats with topcoat.  I've also found this to be a good polish for stamping as it is a fairly opaque cream.


OPI Vant to Bite My Neck?

I LOVE the color of this polish.  I originally bought it when the Euro Centrale collection came out but I actually don't think I used it until the other day.  This polish is a dark and vampy blue leaning purple eggplant cream.  This polish took three coats but I thought the color was stunning.  The formula was good on this one as well.  This polish is without topcoat and it is also a really good stamping polish.


OPI Austin-tatious Turquoise

This color is a pretty color that I found on clearance at Ulta.  This is a fairly sheer teal shimmer polish.  The photos are three coats with no topcoat.  I really liked the one actually, it had a sort of metallic quality to it.


OPI Can You Tapas This?

Last up is a maroon cream.  This formula was good, the photos are two coats without topcoat.  I already had this color in my stash but needed a dark polish after so many summer neons!


Friday 21 June 2013

OPI Polka.com: Three Ways

OPI Polka.com: Swatches Three Ways and Review

Yay it's Friday!  I'm working a half day so I can go and get my hair done (shhhh!)  :)  I had planned on relaxing the entire weekend while the hubby plays airsoft but instead I will be going to the hair salon and hanging out with my parents.  Maybe I can convince my mom into going to ulta with me.  

Today I have OPI Polka.com.  I have been on a real glitter kick lately and I reached for this glitter which has been largely ignored...oops.  It's beautiful!  This polish is packed with lavender, magenta, and teal glitters with small purple glitters.  I got the idea to use this polish on three types of polish, cream, glitter, and shimmer.


Cream Polish:

First up is the cream polish.  I layered Polka.com over OPI Mod About You, a dusty lavender cream. 


Shimmer:

Next up is the shimmer.  For this I used Hard Candy Little Hottie, a shimmery fuchsia pink and a diagonal design.


Glitter:

Last up is the glitter.  This polish is a polish I won in a giveaway from Serbia.  I'm not quite sure of the name but the bottle says DA Nailpolish Glam & Glitter number 105.  It's a really pretty purple glitter than just glows.


Which one is your favorite?  I think it's a toss up between the cream and the glitter for me :)